Friday, October 09, 2009

Network printing for host-based printer HP LaserJet 1000/1005/1018/1020 by Oleg's firmware

What do you need?
  • A wireless router like D-Link DIR-320, which has at least one USB port, with Oleg's firmware inside. 
  • An USB printer. In my case I have HP LaserJet 1018, change it to your printer model.
  • An USB hub if you want to connect more device (USB flask stick, scanner, etc) to the router.


Fig. 1. HP LaserJet 1018 connected to wireless router D-Link DIR-320 through an 4-port USB hub
 

Why is Oleg's firmware?

Because original router firmware doesn't work with host-based printer like HP Laserjet 1018, thus it's needed to load some printer firmware to this kind of printer to make it operates properly. And beside that, you don't have much things to do with the manufactor's firmware. Oleg's firmware gives you more freedom of operations. If you have a D-Link DIR-320, you can see how to reflashing your router in my other post. The owner of other router can check Oleg's firmware website and forum.

1. Server settings

The main idea here is putting printer firmware in some place, where the router can find and load it to printer when the last one is connected. You need to download/create some files as below:

1.1. sihp1018.dl

This is the printer firmware. We need to load this file to printer. After login to the router by ssh, you can get this firmware from Oleg's firmware website as below:

$ wget http://oleg.wl500g.info/hplj/sihp1018.dl -O /tmp/sihp1018.dl

All the files in /tmp will be deleted every time the router rebooted. Remember to download printer firmware again if you don't have external storage media. In case you have an USB hub and an USB flash stick mounted under /opt, you can have second copy of firmware on the USB stick:

$ mount /dev/discs/disc0/part1 /opt
$ cp sihp1018.dl /opt

1.2. /usr/local/sbin/usb_printerid

wget http://oleg.wl500g.info/hplj/usb_printerid -O /usr/local/sbin/usb_printerid

1.3. /usr/local/sbin/hotplug.sh

This file is a hotplug script, which will load printer firmware automatically every on/off cycle.

#!/bin/sh
LOG=/tmp/hotplug.log
PRN_BIN=/usr/local/sbin/usb_printerid
PRN_FRM1=/tmp/sihp1018.dl
PRN_FRM2=/opt/sihp1018.dl
# Logging
echo --------------- >> $LOG
date >> $LOG
echo $* >> $LOG
set >> $LOG
if [ "$ACTION" = "add" ] || [ "$1" = "usb" ] || [ "$DEVFS" = "/proc/bus/usb" ]; then
sleep 5
$PRN_BIN /dev/usb/lp0 | grep -q FWVER || cat $PRN_FRM1 > /dev/usb/lp0;
$PRN_BIN /dev/usb/lp0 | grep -q FWVER || cat $PRN_FRM2 > /dev/usb/lp0
echo "Printer OnLine" >> $LOG
else
echo "Printer OffLine" >> $LOG
fi
killall hotplug.sh

1.4 /usr/local/sbin/post-boot

Commands in this file will be executed after router's booting. Here I use it to mount USB flash stick, load firmware to printer if it is on and connected and the firmware is not presented on printer. At last, the hotplug script about is load to kernel's hotplug.

#!/bin/sh
# Mount USB flash disk
if [ -w /dev/discs/disc0/part1 ]; then
mount /dev/discs/disc0/part1 /usr/local/flashdisk
fi
# Load firmware to printer if the printer is connected and
# firmware is not loaded (grep -q FWVER)
if [ -w /dev/usb/lp0 ]; then
  /usr/local/sbin/usb_printerid /dev/usb/lp0 | grep -q FWVER || cat /tmp/sihp1018.dl > /dev/usb/lp0;
  /usr/local/sbin/usb_printerid /dev/usb/lp0 | grep -q FWVER || cat /opt/sihp1018.dl > /dev/usb/lp0
fi
# Hotplug script
echo "/usr/local/sbin/hotplug.sh" >> /proc/sys/kernel/hotplug

After downloading/creating files, we need to make some of them executable and then save the flashfs:

$ chmod +x /usr/local/sbin/*
$ flashfs save
$ flashfs commit
$ flashfs enable
$ reboot

That's all from server side. Now you can connect printer to router, turn it on and configure the client side, after what — print.

2. Client side

2. 1. Linux client

Ubuntu for example. Install and run cupsd:

$ sudo apt-get install cups

Then add printer through GNOME interface (wizard). Not very hard to do. And don't forget to add users to lp group!


Fig. 2. Network printer properties


2. 2. Windows(R) client

I won't show you. I hate Windows users ;).
Read here instead: http://oleg.wl500g.info/printing/

Note:

1. When try:

$ flashfs save && flashfs commit && flashfs enable && reboot

and get

[admin@(none) local]$ flashfs commit
/tmp/flash.tar.gz: File is to big (73504, max 65536)

mean your flash file is not fit on flash ROM. Maybe you download printer firmware to some where in /usr/local. Need to check it:

$ ls -lR /usr/local
lrwxrwxrwx 1 admin root 12 Aug 22 11:35 /usr/local -> ../tmp/local
$ ls -lR /tmp/local

2. If you have connected, for example, 4-port USB hub to the router, then you have more posibilities other than network printing:
  • network storage device,
  • network camera,
  • network scanning, etc.

See http://wl500g.info/forumdisplay.php?f=24 for more compatible hardware with Oleg's firmware.

3. Do not use 3-m USB-cable and over, can cause problem with USB 2.0.

Thursday, October 08, 2009

Transmission Remote GUI


If you're using FreeNAS like me, this application will be useful.

Fig. 1. transgui provides more functions than the web interface

From the readme.txt:
"Transmission Remote GUI is feature rich cross platform front-end to remotely control Transmission daemon via its RPC protocol. It is faster and has more functionality than build-in Transmission web interface.
Transmission Remote GUI is developed using Lazarus RAD and Free Pascal compiler.

Features:
  • Native application for Windows and Linux (GTK2)
  • uTorrent-like interface
  • Select files to download
  • Choose files priority
  • View details about connected peers
  • Full information about each torrent
  • Per torrent options
Project home:
http://code.google.com/p/transmisson-remote-gui/"

Sunday, October 04, 2009

About graphical user interfaces (GUI) for file access

Not counting command line interface (CLI), there are 2 main graphical user interfaces (GUI) for file access:

  1. "Explorer interface": this is the common GUI and widely used in many operating systems, include Linux (fig. 1). User organizes his directory structure himself and has to remember where to find needed information. To take an operation over the desired file, at first user opens a program -- an "explorer", and then move through the directory to file, and at the end do the operation. This looks like CLI, but uses icons instead of commands.
  2. Fig. 1. GNOME File Manager (Nautilus).
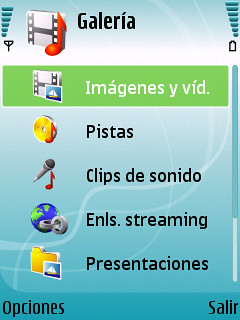
  3. More and more popular is getting, could be called, "Content manager interface" (fig. 2). Here files and folders are classified and organized by its content -- documents, sounds, images, or videos, etc. One or more softwares are used to gain access files. Examples of Content manager interface could be music player on many mobile phones. User even don't know where the files are and how they are saved on the medium. By this GUI, he can do many operations over file/files -- copy, move, rename, remove, etc.
  4. Fig. 2. S60 platform gallery application.
Each GUI for file access has its own advantages and shortages. With Explorer interface, user has full control over his files, but not without detriment. Remember that  ordinary people's memory is no limit. With the nowaday temp of information growing, I vote for the Content manager interface.

Saturday, October 03, 2009

Exploring D-Link DIR-320 networks with Oleg's firmware or what are vlan0, vlan1, eth0, eth1, br0?

What is the device?

It's a D-Link wireless router (4MB flash, 32MB RAM and processor Broadcom 240 MHz) with almost the same configuration as ASUS WL500g Premium (8MB flash, 32MB RAM and processor Broadcom 266MHz), but costs much lower.

Fig. 1. The front of D-Link DIR-320

Fig. 2. The of D-Link DIR-320

Why do I need this wireless router?

Because I want to build a wireless home network with Internet connection (PPPoE) for laptop, netbook (HP 2133) and a telephone (Nokia E63), which supports Wi-Fi. I need the USB port for printing, and in the future ---scanning, USB harddisks, networked web camera, 3G or WiM modems etc.


What is the Oleg's firmware?

It's Linux-based custom firmware for ASUS WL-500gx/WL-550gE/WL-500gp/WL-500W/WL-320gE/WL-320gP/WL-330gE/WL-500gp V2/WL-520gU. There isn't much thing to do with the manufacture's firmware. Instruction of installation (flashing) of the Oleg's firmware on DIR-320 can be found in my blog (in English) or wl500g.info (in Russia).


What are there inside the router with Oleg's firmware?
 

After flashing the device with Oleg's firmware, you can configure Internet connection, Wireless, etc by web brower interface. Don't forget to turn on SSH server (dropbear). After that login and explore:

$ ifconfig
br0 Link encap:Ethernet HWaddr 00:90:4C:C0:00:00
inet addr:192.168.1.1 Bcast:192.168.1.255 Mask:255.255.255.0
UP BROADCAST RUNNING MULTICAST MTU:1500 Metric:1
RX packets:1122700 errors:0 dropped:0 overruns:0 frame:0
TX packets:1113191 errors:0 dropped:0 overruns:0 carrier:0
collisions:0 txqueuelen:0
RX bytes:367622803 (350.5 MiB) TX bytes:586264798 (559.1 MiB)

eth0 Link encap:Ethernet HWaddr 00:90:4C:C0:00:00
UP BROADCAST RUNNING MULTICAST MTU:1500 Metric:1
RX packets:1393411 errors:0 dropped:0 overruns:0 frame:0
TX packets:1113648 errors:0 dropped:0 overruns:0 carrier:0
collisions:0 txqueuelen:1000
RX bytes:935119976 (891.7 MiB) TX bytes:655661617 (625.2 MiB)
Interrupt:4 Base address:0x1000

eth1 Link encap:Ethernet HWaddr 00:90:4C:C1:00:00
UP BROADCAST RUNNING MULTICAST MTU:1500 Metric:1
RX packets:619887 errors:0 dropped:0 overruns:0 frame:19671
TX packets:683607 errors:122 dropped:0 overruns:0 carrier:0
collisions:0 txqueuelen:1000
RX bytes:44888939 (42.8 MiB) TX bytes:305171776 (291.0 MiB)
Interrupt:13 Base address:0x5000

lo Link encap:Local Loopback
inet addr:127.0.0.1 Mask:255.0.0.0
UP LOOPBACK RUNNING MULTICAST MTU:16436 Metric:1
RX packets:40152 errors:0 dropped:0 overruns:0 frame:0
TX packets:40152 errors:0 dropped:0 overruns:0 carrier:0
collisions:0 txqueuelen:0
RX bytes:3718052 (3.5 MiB) TX bytes:3718052 (3.5 MiB)

ppp0 Link encap:Point-to-Point Protocol
inet addr:93.88.141.40 P-t-P:93.88.128.253 Mask:255.255.255.255
UP POINTOPOINT RUNNING MULTICAST MTU:1492 Metric:1
RX packets:647631 errors:0 dropped:0 overruns:0 frame:0
TX packets:661658 errors:0 dropped:44 overruns:0 carrier:0
collisions:0 txqueuelen:3
RX bytes:545701887 (520.4 MiB) TX bytes:346044024 (330.0 MiB)

vlan0 Link encap:Ethernet HWaddr 00:90:4C:C0:00:00
UP BROADCAST RUNNING MULTICAST MTU:1500 Metric:1
RX packets:504058 errors:0 dropped:0 overruns:0 frame:0
TX packets:443975 errors:0 dropped:0 overruns:0 carrier:0
collisions:0 txqueuelen:0
RX bytes:334078103 (318.6 MiB) TX bytes:292107592 (278.5 MiB)

vlan1 Link encap:Ethernet HWaddr 00:90:4C:C0:00:00
inet addr:10.13.5.65 Bcast:10.13.5.255 Mask:255.255.255.0
UP BROADCAST RUNNING MULTICAST MTU:1500 Metric:1
RX packets:889353 errors:0 dropped:0 overruns:0 frame:0
TX packets:669673 errors:0 dropped:0 overruns:0 carrier:0
collisions:0 txqueuelen:0
RX bytes:575960475 (549.2 MiB) TX bytes:363554025 (346.7 MiB)

Physically the wireless router D-Link DIR-320 has a 2-port router and a 6-port switch. One port of the switch is connected to the router, another one is the WAN port. The other 4 ports of the switch are the LAN ports on the back of DIR-320. The remaining port of the router is connected to the WLAN adapter.

Inside the switch exist two Virtual LANs (VLans) --- vlan0 and vlan1. vlan0 contains ports 4 LAN ports (ports 1--4) and one router port (port 6). vlan1 contains WAN port (port 0 or "Internet Port" written on the back) and router port (port 6).

There is a bridge (br0) bridging eth1 (WLAN) and eth0 (switch port 0). This bridge allows WLAN and LAN to share the same IP address. When the router needs to send information to clients, it broadcasts out br0 (to eth1 and vlan0). When we need to send information to Internet (WAN), router send directly to vlan1. 

$ brctl showmacs br0
port no    mac addr        is local?    ageing timer
  2    00:1b:9e:7f:96:38    no           0.77
  2    00:21:00:62:c1:86    no           0.00
  2    00:23:b4:ce:cd:4e    no          36.52
  1    00:90:4c:c0:00:00    yes           0.00
  2    00:90:4c:c1:00:00    yes           0.00

  2    02:90:4c:c1:00:00    no          29.23


Reflashing wireless router D-Link DIR-320 with Oleg's firmware

The procedure of reflashing Oleg's firmware on D-Link DIR-320:
  1. Getting the latest firmware from http://code.google.com/p/wl500g and rename it to firmware.bin.
  2. Save it to c:\bin
  3. In c:\bin create file flashing.cmd with the following content:
  4. @Echo Off
    :BEGIN
    ping -n 1 -w 1 192.168.0.1
    If errorlevel 1 Goto BEGIN
    If errorlevel 0 Goto FLASH
    Goto END

    :FLASH
    Echo *** Start Flashing ****
    tftp -i 192.168.0.1 put firmware.bin

    :END

  5. Connect computer to the router by an Ethernet cable with the following LAN setting: IP address 192.168.0.2, netmask 255.255.255.0, no need to write gateway and DNS. Do not power on the router.
  6. Run cmd, then change directory to c:\bin and run flashing.cmd
  7. Push and hold Reset while power on the router. When the LAN LED is blinking, you can release Reset button.
  8. Wait while the reflashing process is running.
  9. When the status LED is on (after 1--2 minutes), we need to reset router's default settings. Push and hold Reset button untill status LED starts blinking. Release Reset. The router restarts and will be ready with new firmware.
After reflashing you need to change computers' WLAN or/and LAN adapters settings to get IP address and DNS automatically. Open a web browser and type http://192.168.1.1 to login the router with username admin, password admin. You can change username, password and other setting in this web browser interface.

Bash script for Linux users (instead of flashing.cmd):

#!/bin/bash
ping_router() {
result=1
until [[ "$result" = 0 ]]
do
ping -c 1 -W 1 -i 1 192.168.0.1
result=$?
done
}

ping_router

echo "*** Start Flashing **** "
tftp 192.168.0.1 -m binary -c put ./firmware.bin
if [[ "$?" = 0 ]]
then echo "Firmware successfully loaded!";
fi

Friday, October 02, 2009

The usage of FreeNAS BitTorrent under a router

To use FreeNAS BitTorrent when NAS connected to Internet by a router, we must do some configurations.
  1. For Downloading: We need DNS settings. Open FreeNAS web interface (http://192.168.1.250). Username is admin and password is freenas by default. Under System | General Setup we write IPv4 of DNS severs. In my case I wrote IP of the router --- 192.168.1.1
  2. For Uploading: Beside DNS we also need port settings. FreeNAS BitTorrent uses default port 51413, which could be closed by router's Firewall. We need open it or in my case use an other opened port (31929). The port setting is under Services | BitTorrent (Peer Port). Don't forget to enable Port forwarding.

Saving FreeNAS configuration on USB flash disks

When running FreeNAS from CD, you can save its configuration to an USB flash disk and restore from there when rebooting. To do this, all you need is connecting the USB flash disk before booting.