Showing posts with label OSS. Show all posts

Thursday, May 22, 2014

Photobook by LaTeX as PDF preparation for Blurb.com

DIY photo book by LaTeX is hard (!) but possible.

Why LaTeX [http://latex-project.org/]?
- It’s open and free;
- It’s powerful and beautiful;
- It’s scientific;
etc.

How I did it?
- Mainly using LaTeX minipage environment.
- And some LaTeX packages.

What's inside the archives?
- Take a look at the included README.txt file.

OK, where can I get them?
- Archives will be named photobook-ddmmyy.zip, current version is photobook-21052014.zip (have been done as May 21st 2014), located in [this Google Drive folder] (click to open).
- See pdf files layouts-ddmmyy.pdf in the Google Drive folder for overview of available templates.

Happy Children’s Day!

P.S. How to edit photos?
- Use your favorite editor, mine is GIMP.
- For batch (size, rotate,..) converting, convert in the ImageMagick suite is recommended. Again, use your favorite tool!

Friday, April 29, 2011

My article about FreeNAS is now online

The article is avaiable at PCWorld Vietnam's website [1] since May 2010 and has been voted as almost 10/10. Thank you all readers.

[1] http://www.pcworld.com.vn/articles/cong-nghe/ung-dung/2010/05/1219106/tu-tao-nas-tu-may-tinh-cu/

Saturday, September 18, 2010

Some crontab usages

1. Run a command at boot time
In /etc/crontab add:

@reboot root command

Replace root with username to run as regular user:


@reboot phan vnc4server :1 -geometry 1200x800 &


2. Run GUI programs
To run a GUI program by cron, we have to tell what display should be used by:

DISPLAY=:0 or export DISPLAY=:0

For example, to change fluxbox background automatically twice per hour, at 0 and 30 minute, run crontab -e, then add the following line:

0,30 * * * * DISPLAY=:0 fbsetbg -f -r $HOME/.fluxbox/backgrounds/

Change display number if needed, :0 will be right for most cases.

3. Daily backup to Dropbox at midnight
Run crontab -e, then add:

# run five minutes before midnight, every day
55 23 * * * $HOME/Dropbox/bin/b2d.daily && $HOME/out 2&>1

b2d.daily is a shell script:

$ cat $HOME/Dropbox/bin/b2d.daily


#!/bin/bash
tar czvf $HOME/Dropbox/My-Dir-`date +%F`.tar.gz \
$HOME/My-Dir && DISPLAY=:0 dropbox start

Here we see another way to run GUI programs by cron. Of course, you can use 2 continuous cron jobs, first — run tar, second — dropbox, instead of using b2d.daily script.

P.S. share your cron usages, if there're no top secrets.

Sunday, September 12, 2010

2-Cent Tip: Russian Keyboard Layout in Fluxbox

Russian Keyboard Layout in Fluxbox:

$ cat $HOME/.fluxbox/startup | grep kb
fbxkb &
setxkbmap -layout "us,ru(winkeys)" -option "grp:caps_toggle" -option "grp_led:scroll"

By using winkeys variant we have all keyboard shorcuts (Ctrl+C, Ctrl+V, etc) work.

Saturday, September 11, 2010

Combination of XDrawChem and Inkscape as an open-source molecular editor

There are dozen molecular editor for chemistry and biology [1], but very few of them are open source (or even free for education), and the lasts are feature-limited. Thus, XDrawChem [2] can draw quiet complicated molecules, but draws them not very beautifully. In the other side, this open source program can export images in SVG format, used as default in Inkscape [3], a famous vector editor, which is used to produce very beautiful drawings.

Our action is:
First, draw the molecule (or parts of it) in XDrawChem, then export the image in SVG format:
Draw part of the future molecule (Tinuvin 320) in XDrawChem

Open and edit the SVG file in Inkscape, and don't forget to convert text to path, if you want to edit the file in other system:
Tinuvin 320 (antioxidant)

Finally, save as pdf to use in a LaTeX document, or export to PNG to use in OpenOffice.org.

  1. http://en.wikipedia.org/wiki/Wikipedia:Manual_of_Style_(chemistry)/Structure_drawing
  2. http://xdrawchem.sourceforge.net/
  3. http://www.inkscape.org/

Friday, September 10, 2010

A workaround for OpenOffice.org Draw selection export to PDF

In the current version of OpenOffice.org 3.2, there is still a problem with selection export to PDF in Draw program — the result pdfs always have page dimension of the drawing (A4 or letter) as its paper size (fig. 1). For printing, this is fine, but annoying if you want, for example, include the graphic in a LaTeX document.
Fig. 1. Selection export to PDF bug.
To workaround this problem, change the drawing's page paper to the selection's size in menu Format / Page... then export. The selection's size can be found in the status bar (fig. 2).

Fig. 2. Selection's size in status bar (red stroke).
The result is fig. 3.
Fig. 3. PDF file by workaround.

P.S. Just one more tip: to export OpenOffice.org Calc chart to PDF, copy it to Draw, then...

Thursday, September 02, 2010

Setup a FreeNAS virtual machine in Linux by VirtualBox

We will consider two VirtualBox features — raw hard disk access and VBoxHeadless, to create and run a FreeNAS server "in background" (as a Linux service). It takes us 3 steps.

Step 1. Create and setup (install) a FreeNAS virtual machine with a small hard disk in VirtualBox, network interface is "bridged". The easiest way is using VirtualBox graphical interface. We are not going into details. Just be aware to use so-called "embedded" FreeNAS if you have much of RAM (FreeNAS 0.7.1 requires minimum 192MB). Otherwise install "full version" of FreeNAS and use swap, because the host (Linux) system needs RAM, too.

Step 2. Add raw disk to virtual machine [1].

Step 3. Use VBoxHeadless to run FreeNAS virtual machine without GUI:

$ VBoxHeadless --startvm FreeNAS --vrdp=off >> $HOME/VBoxHeadless.out 2>&1

Read more about VBoxHeadless in VirtualBox documentation [2]. In the command above FreeNAS is the name of created virtual machine, we turn vrdp server off, as FreeNAS has a very powerful Web interface at http://192.168.1.250 by default [3].
You may want to run the virtual machine automatically during boot process. Be aware to run it after vboxdrv service. For this purpose the most convenient solution is /etc/init.d/rc.local. This script run last, but run as root, thus sudo command is used:


$ cat /etc/rc.local
#!/bin/sh -e
#
# rc.local
#
# This script is executed at the end of each multiuser runlevel.
# Make sure that the script will "exit 0" on success or any other
# value on error.
#
# In order to enable or disable this script just change the execution
# bits.
#
# By default this script does nothing.


sudo -H -u phan VBoxHeadless --startvm FreeNAS --vrdp=off >> $HOME/VBoxHeadless.out 2>&1


exit 0

Change phan to your username. The -H option is important, it tell sudo to set HOME environment variable to the home directory of the target user, where VBoxHeadless will find the virtual machine with "FreeNAS" name.

P.S. don't forget to turn off FreeNAS virtual machine before shutdown Linux.

Monday, August 30, 2010

Note about permissions in VirtualBox physical hard disk usage in Linux host

From VirtualBox manual: "Starting with version 1.4, as an alternative to using virtual disk images, VirtualBox can also present either entire physical hard disks or selected partitions thereof as virtual disks to virtual machines...
...this type of access is called "raw hard disk access"; it allows a guest OS to access its virtual hard disk without going through the host OS file system."
Do read the manual (part 9.7.1 at now) and do it at your own risk! Here we will talk only about permission problem you can get in Linux host. That, you will need read/write access for the entire disk (or selected partitions). For example:

$ VBoxManage internalcommands createrawvmdk -filename $HOME/.VirtualBox/HardDisks/sda2.vmdk -rawdisk /dev/sda -partitions 2

set up an image for access /dev/sda2 in Linux host. User needs read/write access to this partition. Otherwise, we will get some messages like this while adding sda2.vmdk to a virtual machine:

NS_ERROR_FAILURE (0x80004005)
Component: 
HardDisk
Interface: 
IHardDisk {xxxxxxxx-xxxx-xxxx-xxxx-xxxxxxxxxxxx}
Callee: 
IVirtualBox {xxxxxxxx-xxxx-xxxx-xxxx-xxxxxxxxxxxx}

Check the physical disks properties:

$ ls -l /dev/sda*

brw-rw---- 1 root disk 8, 0 2010-08-30 21:53 /dev/sda
brw-rw---- 1 root disk 8, 1 2010-08-30 12:22 /dev/sda1
brw-rw---- 1 root disk 8, 2 2010-08-30 21:31 /dev/sda2
brw-rw---- 1 root disk 8, 5 2010-08-30 12:22 /dev/sda5

We can see one solution to grant permissions is adding username to the disk group, for example, by editing /etc/group file. And don't forget to re-login.

Friday, August 27, 2010

Very short about using transmission-daemon

The transmission-daemon program is a daemon-based Transmission session that can be controlled via IPC commands by transmission-remote(1) [1]. This program is used by default in FreeNAS, and maybe you want to use it on Linux box. It's very likely you distribution come with transmission by default. In that case, you need to install transmission-daemon only:

# apt-get install transmission-daemon


Configuration file is /var/lib/transmission-daemon/info/settings.json (it's quiet safe to add *.*.*.* to rpc-whitelist option). After editing (user, password, paths, etc), we need to reload the daemon itself:

# /etc/init.d/transmission-daemon reload

Using remote client was discussed before [2].
Note: transmission-daemon configuration is very well documented on this web site. You are recommended to read (at least to feel the power of FreeNAS's web interface).

1. man transmission-daemon
2. Cross-platform transmission-remote-gui

Friday, August 20, 2010

Disable unused console (tty) when using Upstart init daemon

There are not /etc/inittab anymore, but /etc/init/ttyN.conf (N from 1 to 6). Just comment out the last line in each file you desire. For example (in /etc/init):

$ cat tty1.conf
# tty1 - getty
#
# This service maintains a getty on tty1 from the point the system is
# started until it is shut down again.

start on stopped rc RUNLEVEL=[2345]
stop on runlevel [!2345]

respawn
exec /sbin/getty -8 38400 tty1

$ cat tty1.conf | wc -l
10

$ sed -i '10 s/^/#/' tty{2,3,4,5,6}.conf

Please tell me other command lines to do the last job.
P.S. in an Ubuntu box Ctrl+Alt+Backspace now is Right Alt (Alt Gr) + Print Screen + k.

Wednesday, August 18, 2010

Boot System Rescue CD from ISO image on the disk with Grub2

"SystemRescueCd is a (Gentoo) Linux system rescue disk available as a bootable CD-ROM or USB stick for administrating or repairing your system and data after a crash." The latest version include many administration tool of both CLI and GUI. If you frequently use SystemRescueCd, you may want to boot it directly from Grub2.
From version 2 GRUB can provide the GREAT loopback option, in co-junction with whom some Linux Live CD distributions (grml, SystemRescueCd, etc) provide direct boot (iso9660) ISO via their options — isofrom, findiso, isoloop and some others. Option isoloop is only supported in SystemRescueCd from version 1.4.0.
The ISO is in (hd0,3)/ISOs/. grub.cfg has the following entry:

# Boot system rescue CD from ISO
menuentry "System Rescue CD from ISO" {
loopback loop (hd0,3)/ISOs/res-1.5.8.iso
linux (loop)/isolinux/rescuecd isoloop=/ISOs/res-1.5.8.iso setkmap=us
initrd (loop)/isolinux/initram.igz
}

grub.cfg contains the global option set root='(hd0,3)', so boot script will search the ISO image in /dev/sda3 partition in the path specified after isoloop option.

Read more:
1. Boot the SystemRescueCD ISO image from the disk using Grub2
2. Boot an ISO via Grub2
3. MultiBoot USB with Grub2 (boot directly from iso files)

Tuesday, February 02, 2010

Bash script for batch renaming of video files, based on the media information

We have a (quiet good) Panasonic miniDV camcorder to save our Little Boy's moments. Software comes with the device can auto index the tape by recoreded date attribute and then batch capture (copy) all the movie to hard disk. It's wonderful feature, except the filenames — we got something like this for every tape:

phan@phan-laptop:/mnt/TQA/Videos/Sushi-1Y/08.03.09-31.05.09$ ls
hsicon.stg     MOVIE0006.avi  MOVIE0012.avi  MOVIE0018.avi  MOVIE0024.avi  MOVIE0030.avi
MOVIE0001.avi  MOVIE0007.avi  MOVIE0013.avi  MOVIE0019.avi  MOVIE0025.avi  MOVIE0031.avi
MOVIE0002.avi  MOVIE0008.avi  MOVIE0014.avi  MOVIE0020.avi  MOVIE0026.avi  MOVIE0032.avi
MOVIE0003.avi  MOVIE0009.avi  MOVIE0015.avi  MOVIE0021.avi  MOVIE0027.avi  TAPE08032009_1902.tap
MOVIE0004.avi  MOVIE0010.avi  MOVIE0016.avi  MOVIE0022.avi  MOVIE0028.avi
MOVIE0005.avi  MOVIE0011.avi  MOVIE0017.avi  MOVIE0023.avi  MOVIE0029.avi


Naturally, it is wanted to rename the movies to show the recorded date and, maybe, some other userful information. Although I like Métamorphose and other batch renaming tools, they can't extract video data. So I decided to create my own bash script. Here is it:

#!/bin/bash
# Bash script for batch renaming of video files, recored by a miniDV-tape
# camcorder, based on the media information (Recorded Date in my case).
# Created by Phan Vinh Thinh, teppi {-} vnoss.org,
# released 01 Feb 2010 under GPL, so feel free to make changes.
# In the script used some echo commands for diagnostic purpose
###############################################################################

# If there is not any given argument (filename), print the help message
if [ $# -eq 0 ]; then
echo "vrename.sh --- Bash script for batch video files renaming";
echo "Usage: ./vrename.sh [files]";
echo "Examples:";
echo -e "\t./vrename.sh *.avi";
echo -e "\t./vrename.sh MOVIE0001.avi MOVIE0002.avi MOVIE0005.avi";
fi;

#for FILE in MOVIE*.avi; do
# $@ expands to all command-line parameters separated by spaces
for FILE in $@; do

# Get the Recorded Date in YYYYMMDDhhmm format and then
# assign to TIME variable
TIME=`mediainfo $FILE | grep -i "recorded date" | cut -d ':' --field=2-3 | \
tr -cd [:alnum:]`;
#echo $TIME;

# Change date format to which we want
    YEAR=${TIME%????????};
    MIN=${TIME#??????????};
    HOUR=${TIME#????????};
    HOUR=${HOUR%$MIN};
    DAY=${TIME#??????};
    DAY=${DAY%$HOUR$MIN};
    MON=${TIME%??????};
    MON=${MON#$YEAR};
#    echo $DAY-$MON-$YEAR-$HOUR-$MIN;

# Change month to short name format (Jan, Feb, etc)
    if [ "$MON" = "01" ] ; then
        Month=Jan;
    elif
    [ "$MON" = "02" ]; then
        Month=Feb;
    elif
    [ "$MON" == "03" ]; then
        Month=Mar;
    elif
    [ "$MON" = "04" ] ; then
        Month=Apr;
    elif
    [ "$MON" = "05" ] ; then
        Month=May;
    elif
    [ "$MON" = "06" ] ; then
        Month=Jun;
    elif
    [ "$MON" = "07" ] ; then
        Month=Jul;
    elif
    [ "$MON" = "08" ] ; then
        Month=Aug;
    elif
    [ "$MON" = "09" ] ; then
        Month=Sep;
    elif
    [ "$MON" = "10" ] ; then
        Month=Oct;
    elif
    [ "$MON" = "11" ] ; then
        Month=Nov;
    elif
    [ "$MON" = "12" ] ; then
        Month=Dec;
    else
        echo "Try without any argument to see help!"
        exit 1;
    fi;
#    echo $Month;

# Assign NAME variable --- basename for future filename
    NAME=Movie-$DAY$Month$YEAR-$HOUR$MIN;
#    echo $NAME;

# Rename FILE to NAME.avi
# Use -i option to make sure there are not 2 files with same NAME
    mv -i -v $FILE $NAME.avi;
done


(To obtain media information, we need an external program — mediainfo).
You can download the script in gzip format from my Google Docs share.

Running script, we got:

phan@phan-laptop:/mnt/TQA/Videos/Sushi-1Y/08.03.09-31.05.09$ ~/vrename.sh *.avi
`MOVIE0001.avi' -> `Movie-08Mar2009-1902.avi'

`MOVIE0002.avi' -> `Movie-08Mar2009-1904.avi'
`MOVIE0003.avi' -> `Movie-08Mar2009-1905.avi'
`MOVIE0004.avi' -> `Movie-08Mar2009-1906.avi'
`MOVIE0005.avi' -> `Movie-08Mar2009-1907.avi'
`MOVIE0006.avi' -> `Movie-16Mar2009-1244.avi'
`MOVIE0007.avi' -> `Movie-16Mar2009-1252.avi'
`MOVIE0008.avi' -> `Movie-16Mar2009-1339.avi'
...

P.S. It's time to start Perl learning ;).

Thursday, October 08, 2009

Transmission Remote GUI


If you're using FreeNAS like me, this application will be useful.

Fig. 1. transgui provides more functions than the web interface

From the readme.txt:
"Transmission Remote GUI is feature rich cross platform front-end to remotely control Transmission daemon via its RPC protocol. It is faster and has more functionality than build-in Transmission web interface.
Transmission Remote GUI is developed using Lazarus RAD and Free Pascal compiler.

Features:
  • Native application for Windows and Linux (GTK2)
  • uTorrent-like interface
  • Select files to download
  • Choose files priority
  • View details about connected peers
  • Full information about each torrent
  • Per torrent options
Project home:
http://code.google.com/p/transmisson-remote-gui/"

Sunday, October 04, 2009

About graphical user interfaces (GUI) for file access

Not counting command line interface (CLI), there are 2 main graphical user interfaces (GUI) for file access:

  1. "Explorer interface": this is the common GUI and widely used in many operating systems, include Linux (fig. 1). User organizes his directory structure himself and has to remember where to find needed information. To take an operation over the desired file, at first user opens a program -- an "explorer", and then move through the directory to file, and at the end do the operation. This looks like CLI, but uses icons instead of commands.
  2. Fig. 1. GNOME File Manager (Nautilus).
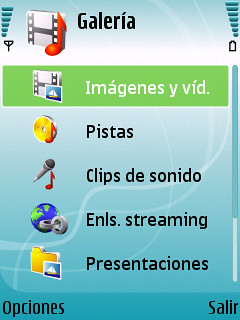
  3. More and more popular is getting, could be called, "Content manager interface" (fig. 2). Here files and folders are classified and organized by its content -- documents, sounds, images, or videos, etc. One or more softwares are used to gain access files. Examples of Content manager interface could be music player on many mobile phones. User even don't know where the files are and how they are saved on the medium. By this GUI, he can do many operations over file/files -- copy, move, rename, remove, etc.
  4. Fig. 2. S60 platform gallery application.
Each GUI for file access has its own advantages and shortages. With Explorer interface, user has full control over his files, but not without detriment. Remember that  ordinary people's memory is no limit. With the nowaday temp of information growing, I vote for the Content manager interface.

Friday, October 02, 2009

The usage of FreeNAS BitTorrent under a router

To use FreeNAS BitTorrent when NAS connected to Internet by a router, we must do some configurations.
  1. For Downloading: We need DNS settings. Open FreeNAS web interface (http://192.168.1.250). Username is admin and password is freenas by default. Under System | General Setup we write IPv4 of DNS severs. In my case I wrote IP of the router --- 192.168.1.1
  2. For Uploading: Beside DNS we also need port settings. FreeNAS BitTorrent uses default port 51413, which could be closed by router's Firewall. We need open it or in my case use an other opened port (31929). The port setting is under Services | BitTorrent (Peer Port). Don't forget to enable Port forwarding.

Saving FreeNAS configuration on USB flash disks

When running FreeNAS from CD, you can save its configuration to an USB flash disk and restore from there when rebooting. To do this, all you need is connecting the USB flash disk before booting.

Thursday, January 22, 2009

Stardict 3.0.1 does not pronounce in Debian

Some knows that Stardict can pronounce English words contained as wav files in the WyabdcRealPeopleTTS.tar.bz2 package, if untar the last to /usr/share. On my Debian system, the dictionary program stops pronounce when I upgraded stardict to 3.0.1 version. And when upgrading I noticed the appearance of some new packages such as festival, espeak, which suppose to do the same thing. Saying faithfully, I'm still not familir with these programs, so I was looking for other solution. In Stardict's sound configuration command for playing wav files by default is play. It could not be found by whereis. Insteed, aplay was found. So I changed play to aplay, and suprisedly it works!
Give it a try if you have the same problem.

Tuesday, June 17, 2008

Printing from Linux to Windows(R). Part I Window(R) 98

Yes, maybe I'm suprising you, but it is my real history. At the (chemistry) laboratory, where I'm working we have an old machine with pre-installed Windows(R) 98, to which is connected a Xerox 3121 through parallel port (parport or LPT). At work I've just installed Kubuntu 8.04 to check how people made it popular (Debian Lenny works perfectly on my home desktop). In my opinion, Kubuntu, in particular, and Ubuntu, in general, are worth to be desktop distrib. But it is another history.


1. My attempt to print from Kubuntu box to Windows(R) 98 by CUPS/Samba was fail. But I going to describe it here:

1.1. Share printer on Windows(R) 98 host:
Open Control Panel -> Network Settings -> Access to Files and Printers (or similar, I use Russian Version of Windows(R) 98). Open Printers Setting -> Share (under a simple name, for example, XEROX).

1.2. Make sure you have cupsys, splix packages installed, because Xerox 3121 uses splix driver, then open in a web browsers CUPS administration interface at http://127.0.0.1:631. Add printer via device URI smb://192.168.8.210/XEROX, and choose driver (manufacturer Xerox, model Xerox 3121 with locale version of driver, en and some others available). Finally, give root as username and its password to add new printer. At the end, you can configure the new added printer.

Attention: Ubuntu users must give their name (not root). I think they know better than me :).

But when printing to new printer I got this error message in the Printer tab of CUPS administration web interface: "Unable to connect to CIFS host". And:

$ smbclient -L 192.168.8.210
session request to 192.168.8.210 failed (Called name not present)
session request to 192 failed (Called name not present)
session request to *SMBSERVER failed (Called name not present)

I'm not a super user, but I guest Windows 98 does not support printer sharing via Samba, or that feature is not working the right way, because of this concret Windows(R) distribution. Although, files sharing (read & write) works well.

2. I've resolved this problem in the other way. Search a bit, I've found an article about LPD Win (developed by G. Zander) - a LPD service for Windows(R) before 2000. Download it, extract the archive, and configure this small program (setup spool, allowed hosts, add to registry to run as service, add new printer, configure this printer as local one), that all we need to do on the server side. I don't tell you where to download because I don't know under which license LPD Win is released. I even didn't found it (the license) at all.

Configuration the client side (Ubuntu box) remains the same. Only different is the device URI (use lpd://192.168.8.210/XEROX, insteed).

Read more: http://gentoo-wiki.com/HOWTO_print_winserver
http://www.penmachine.com/techie/lpdprinting_2003-08.html

Thursday, June 05, 2008

Install HP LaserJet 1018 printer on Debian systems.
Part III. Sharing with Windows system

Printer sharing is something common now. Because even at home we can have more than one computers, which in the most cases are connected to a local network (LAN). Now, when you've got your HP LJ 1018 be configured and works well on Linux system, it's time to make printer shared by CUPS. CUPS has client/server model, it means we must configure CUPS server on Linux to accept client requests from other machines. It requires you know how to install printer on Windows(R) systems. Trust me, it is not such easy in cases with Vista ;).

Open web interface (http://localhost:631/) to configure the server side. At this web page, choose Administration tab, in Basic Server Settings: tick Share published printers connected to this system, then update by click Change settings. Don't forget to open port 631 in your firewall's setting and check Allowed users setting of the shared printer.

Client side configuration here applies for Windows(R) 2000/XP/Vista. I prefer installing drivers before from the CD with printer. Then just open printer setting in Control Panel, click add printer, choose network printer and adding by yourself. Then type the address of printer, something like this:

http://192.168.0.22:631/printers/HP

where HP is the printer name. After that, install correct driver, etc. That's all. Additionally, you can configure new printer and print the test page. Everything is simple, but you need to be lucky, at least because Windows(R) system are unpredictable :).

Note: when you add new printer to your new purchased Vista box, some strange things can happen. Just ignore them. Restart Vista. Hope printer will be ready.

Read more:
http://wiki.archlinux.org/index.php/CUPS_Setup#Printer_Sharing
cupsd.conf(5) -- a short man page.

Monday, May 12, 2008

A successful history with Creative Sound Blaster Connect

Yesterday I purchased a new external (USB) sound card from Creative - Sound Blaster Connect (SB Connect). I didn't get it work immediately and search on Google about its supporting under Linux. ALSA project site showed that it seems not have driver for SB Connect although the card is there in the list.

Creative Sound Blaster Connect

But today I have other working sound system just after ...reboot. My Debian unstable with ALSA v1.0.13 recognized sound card as SB MP3+. In this case we have so call Plug-and-Play device under Linux :). I don't know if other features like recording are working or not. For now I just have no need of them.

See more pictures and info about card from creative site.